


Second Grade Art Lesson 13
Designing a Treasure Box, Part 2 Foiling Over Our Treasure Boxes
Objective:
The students will continue to plan and design their treasure boxes by covering over the applied shape designs with aluminum foil. The students will enhance the raised or relief designs by making incised lines and shapes creating recessed areas.
Materials:
Each student needs enough aluminum foil to cover both the top and bottom of their box. Other materials include: a thin, white glue and water mixture, an old paintbrush to use with the mixture, a paper towel and any tool with a blunt end (i.e. the end of a thin paint brush, a dulled primary pencil)
Procedure:
Distribute the boxes the students made last week and explain that we are going to cover the boxes with foil to give them that made out of metal look. Both the top and the bottom of the box will need to be covered using the same process, but the top will require more time and attention. Cover the box with a coat of the glue and water mixture using and old or disposable paint brush. (Don't use your good brushes for this for they may not come completely clean.) Once the entire surface is covered, lay the box on top of the foil. For the bottom of the box it is a fairly easy and straightforward process. Simply press the foil tight making it adhere to the box. Fold the ends gift wrap style (see video demonstration) and press the foil up under the lip of the box edges. Use the same procedure for the top, only it will take more time to gently but firmly press the foil down around the raised shapes of cardboard and glue. It is important that the student takes the time to work the box top carefully and solidly so that the applied design will be revealed. Once the entire box has been covered, take a blunt tool to draw in or incise lines, shapes and patterns to create recessed areas. Care must be taken to put out enough pressure for the shapes, lines and patterns to show, but not so much pressure that the foil is ripped. This part of the process usually takes longer and requires greater patience than most 2nd graders want to give. But continue to encourage them not to rush their work, nor to do scribbly work, as they will delight in the end results.
Conclusion:
Remind the class that this is not the final stage of building our treasure boxes but that it is a very important one. Compliment them on their hard work whenever you observe it or be sure to point out when you see the results of carefully controlled effort. Store the box so we can complete them next lesson.
Artwork and Examples used in this lesson
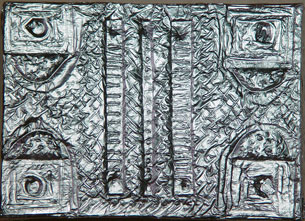
Teachers Example


