


Kindergarten Art Lesson 17
Cool Curvy Lines and Warm Angular Lines, Part 2
Objective:
The concepts presented in the last lesson will be reinforced by having the student create a work of art using the cool curvy and warm angled lines.
Materials:
Each child will need several sheets of white paper, scissors, warm and cool color markers and a glue stick
Procedure:
Ask the students if they can recall what we learned in our last lesson. Explain that today we are going to make an abstract type of art work using the cool curvy and warm angled lines that we worked on last week. This time, however, we are going to cut out our lines and color them with warm and cool color markers. Begin by showing the class how to cut out both angled and curvy lines. Be sure to show them how to turn their paper rather than their scissors. Avoid allowing them to draw the lines off first because they typically draw them to small to cut out. If they cut blank paper they tend to cut out longer and thicker lines. Once each child has between 6 - 8 curvy lines and 6 - 8 angled lines have them color them with the warm and cool color markers (cool on the curvy and warm on the angled). Be sure to put a piece of newspaper or other scrap paper for them to put under their lines while they color to protect the tables. When all of the lines have been colored, give them another blank sheet of white paper to serve as a ground for the lines. Encourage them to play around with the lines as if they were a puzzle. Fit them together in a way that they are most appealing. When they feel good about their design give them a glue stick to glue the lines down.
Conclusion:
Have the students show their work to the class and say one thing they like best about it. Talk to them about the different arrangements they came up with as they were putting their “puzzle” together. Mount their work and display it for everyone to see.
Artwork and Examples used in this lesson
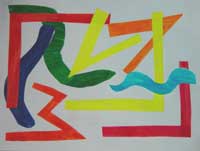
Teachers Example


