


Fourth Grade Art Lesson 22
Chalk Drawing a Snowman, Part 1 Working with Cool Colors
Objective:
The students will show an understanding of using color to communicate temperature by using the cool colors and white to draw a snowman. The student will complete their snowman drawing by filling in the background landscape.
Materials:
any color construction paper (the one you have the most of), chalk pastels (if you do not have chalk pastels, use regular colored chalk), newspaper to cover the tables
Procedure:
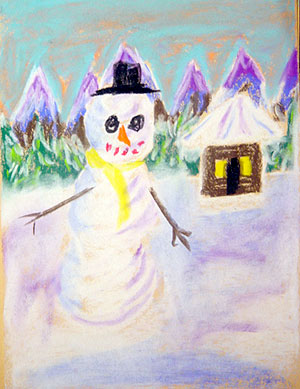
This time of the year in many parts of America it is cold and some states have lots of snow. Where I live we do not get a lot of snow but when we do, one of my favorite things to do is build a snowman. Most children enjoy the process of rolling up large balls of snow to make their own snowman. Even those that do not see much or even any snow like the idea of having a Mr. Freeze in their yard. Today, no matter what the temperature is where you live, you are going to build (draw) your own snowman. My goal is to help you understand how you can use color to create an atmosphere of wintry weather. Namely, we will be using cool colors with white. A lot of students who are uncomfortable drawing have turned in a white piece of paper with no marks of any kind on it and said It's a picture of me and my snowman in a huge snowstorm!. Although snow is white we are going to learn how to use color to show the white wet stuff in a convincing manner. The first step is to plan a composition. Where do you want the snowman to be? Our picture will basically be divided into three parts, the foreground, the middle ground and the background. The snowman needs to be either in the foreground or middle ground. This would mean we need to plan to have him fairly large, taking up a good portion of our paper. Typically my students want to put the snowman right in the center of their paper. I would encourage you to move him slightly to one side or the other. This makes the image a little more interesting and also makes filling in a background a little easier. So take a white chalk pastel and draw off your snowman just to the left or the right of the center of your paper. You may make him with two or with three snowballs. But be sure to make the top snowball smaller for the head. Next, let's decide on the surroundings for your snowman. It would make sense that if a snowman in the picture, there would be lots of snow also. Do you want to include your house? Are there any other buildings around? Where do you want them to be in relation to the snowman? What about trees? Or children playing? Plan your entire composition and draw it off with the white chalk. Next let's make the snow look icy cold! Put a light layer of blue and purple on the snowman. Color in a curved direction to help emphasize the form. Next take the white chalk and color right on top of the blue and purple, smearing it into the colors. Use enough pressure to cover over the paper. Next use whatever colors you need for the other parts of your picture. Remember that if snow has fallen it should be on the tops of other things as well such as the roof top, tree branches, fences tops, cars, etc. Be sure to mix your chalk colors to show the icy snow. Chalk pastels blend well together and ant mistakes you make can be corrected by simply blending in more colors and / or white. Be careful not to blow the chalk dust. Rather, tap the edge of your paper onto the newspaper to shake of excess dust. Be sure to fill in the entire paper with color and details. Think about the time of day you want it to be and mix colors to fill in your sky. Once you feel your drawing is complete, sign your name at the bottom. There is a product called Fix it that you can spray on your drawing to keep it from smearing. If you cannot get any, hairspray will work also.
Conclusion:
Stand at a distance and look at your work. Is there anything you might add to improve it? Is your paper filled with your snowy landscape and snowman? Does the atmosphere look cold with the blues and purples blended into the white? Be sure to mount your drawings and hang them in the hallway for the entire school to enjoy.
Artwork and Examples used in this lesson
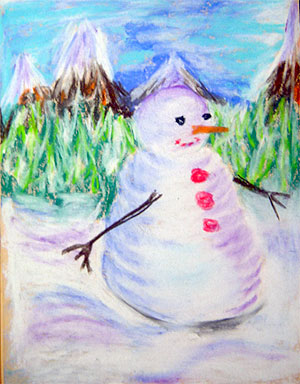
Teacher Example
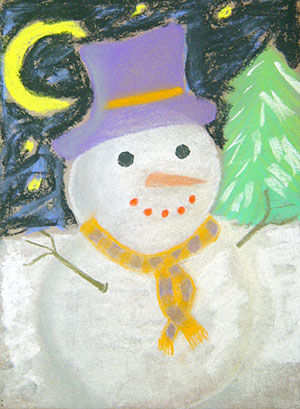
Student Artwork
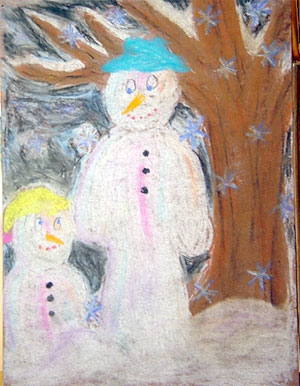
Student Artwork
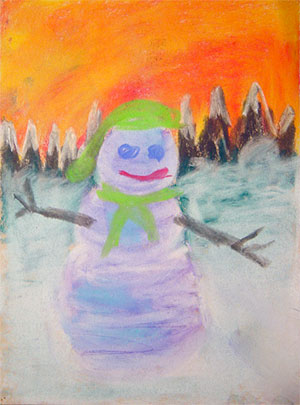
Student Artwork
Student Artwork


Arttango © All Rights Reserved 2013. All logos and images used on this site are the property of the rightful owner