


Fourth Grade Art Lesson 14
Torn Paper Portraits, Part 1 Exaggerating Expressions
Objective:
The student will study their own expressions in a mirror and examine what happens with their facial features with each different expression. The student will begin working on an expressive portrait that will be filled in using torn pieces of construction paper.
Materials:
a mirror for each student, white paper, white glue, a variety of construction papers (the scrap box will work great)
Procedure:
To begin our class I want each student to take a mirror and spend some time looking and examining their face. Look at it straight on to begin with, and then start making changes in your expression. Look particularly at how the lines change with every expression. Notice how your eyebrows draw together when you express and angry face and how your eyes are more closed together than normal. Look at how open your eyes get with a surprised look, and notice the shape of your mouth. Make as many different expressions as you can think of and look at the changes in your facial features that result from each one. You would be wise to do several quick sketches to find the ones you can represent most accurately. Next, take your white background paper and pencil off the expression you want to represent in your portrait. Select the colors you want to use and begin tearing them into small pieces. It is best to fill in the entire face (eyes, nose, mouth and all) with your basic skin color, then go back on top of that to fill in the facial features (eyes, nose, mouth). Do not feel you have to use realistic colors. If you want to use colors to emphasize your expression that is fine. For example, you may want to use blues if you are doing a sad expression, or reds if you are doing an angry expression. Purples work well for surprised or curious expressions. Use your imagination and chose the color that you think will give you the best results. Once you have a collection of torn colors, put a small dot of glue on them one by one and begin filling in your face (not your hair or background). After the face id filled in, begin adding the details of your eyes, nose and mouth. You may need to refer to your mirror to help you see the lines and arrangement of your features with your particular expression. Do not hesitate to do this for it will help you complete a more exact expression. Work until you have the expression completed or until you run out of class time.
Conclusion:
Put the work you have completed in a safe place to dry. Make sure nothing is on top of each piece as frequently wet glue is on the surface. Be prepared to complete your work next lesson.
Artwork and Examples used in this lesson
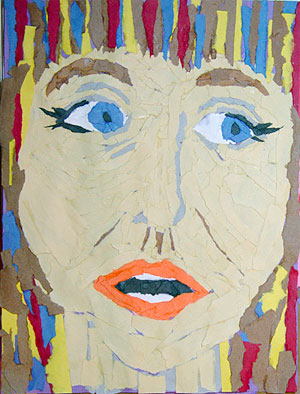
Teacher Example


