


First Grade Art Lesson 10
Looking at Picasso, Part 1 Making Our Own Picasso Portrait
Objective:
The student will become familiar with a work by Pablo Picasso and using geometric shapes will create their own Picasso portrait.
Materials:
12 x 18 inch construction paper, any color, variety of pre-cut geometric shapes, approximately 3 x 3 or 4 x 4, crayons
Procedure:
Today we're going to look at the work by a famous Spanish artist named Pablo Picasso. Let's focus on this one painting called First Steps. Notice how asymmetrical the faces in Picasso's paintings are. Describe what you see. You see a young child drawn mostly with geometric shapes with their mother standing behind them. As the title indicates, the child is taking their first steps. Notice how Picasso has represented everything using basic geometric shapes. Can you name the geometric shapes you see? We are going to make our own Picasso type portrait using only geometric shapes. Your teacher has cut triangles, rectangles, and squares. Select shapes for each of your facial features eyes, nose, mouth, and ears if you want. On each shape draw large your feature (eye for example.) Color in the feature and the background on the shape. Color solidly and make each feature interesting to look at.
Conclusion:
Paperclip your shapes to your background and store until next lesson.
Artwork and Examples used in this lesson
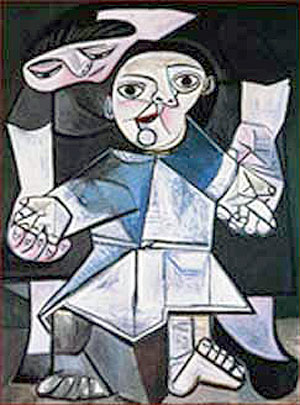
“First Steps”, by Pablo Picasso


